Getting into the grasshopper pose (Maksikanagasana in Sanskrit) can be difficult for even the most experienced yogi. Mastering this arm balance is not impossible by any means but does require much strength and control in both the upper body and thighs. More importantly, grasshopper requires concentration and confidence. It is a pose that will challenge both your physical and mental fitness, so it is the perfect addition to even the most advanced yogi’s practice. To get into this challenging pose, follow the steps below.
Step 1
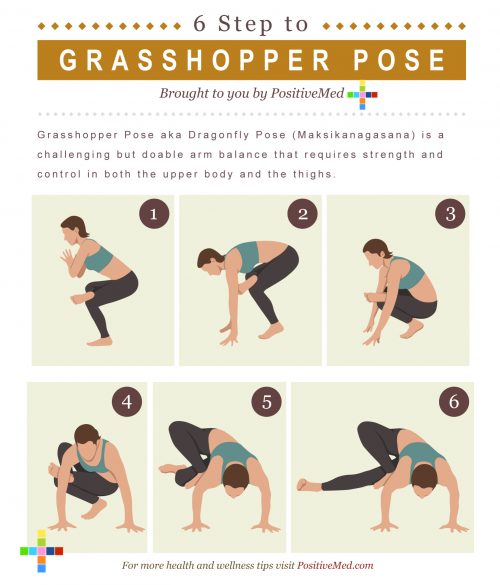
Start by standing with feet flush together. Cross your right leg over your left so that your right foot rests on your left knee. Bend your standing (left) leg and push your tailbone back as if you are sitting in a chair. Then lean your entire body slightly forward, keeping your back flat. Bring hands to prayer position at your sternum.
Step 2
Come up onto your left toes as you reach towards the ground with your hands. Allow your back to round as you lean forward. Touch your fingertips to the ground and shift your weight forward as you do this.
Step 3
Use your core muscles for balance as you crouch down. Stay up on your left toes and fingertips but bring your butt down towards the ground. It should be touching or at least parallel to your left calf. Hunch your back and chest toward your crossed (right) leg.
RELATED ARTICLE: Watch Human Skeleton in Motion While Practicing Yoga
Step 4
Slowly and carefully start rotating your arms and torso to the left. You can take your time doing this so you do not lose your balance. Keep balancing on your left toes as you put your hands flat on the ground. Then slide or crawl your hands around to the left until you are facing perpendicular to your legs. Legs should be facing the front of your mat and torso, head, and arms should be facing the long left side.
Step 5
This is the step where upper body strength really comes into play. With hands flat on the floor, bend your elbows slightly so they are bowed outward. Lean your head and upper body forward. Gaze should be towards the ground and your nose should be about six or eight inches above the floor. Then, using your arm, shoulder, and core strength, lift your legs up off the ground. They should still be in their bent positions with right leg crossed over left. Left leg should be bent at the knee with your left foot facing the long right side of your mat. This step may take a few tries to achieve.
Step 6
To achieve the final form of grasshopper pose, straighten your left leg. The left leg should be parallel to the floor with your left foot flexed so the sole faces the front of your mat. Your elbows should still be slightly bent and gaze should continue to be straight down towards the floor.